The allure of a perfectly sculpted hairstyle is undeniable, and few looks capture the essence of vintage elegance quite like finger waves. From the roaring twenties to today's red carpets, this iconic 'S'-shaped pattern has graced the heads of fashionistas and celebrities alike, making a powerful statement of sophistication and artistry. Whether you're aiming for a classic retro vibe or a sleek, modern twist, mastering the art of finger waves opens up a world of glamorous possibilities.
This comprehensive guide will delve deep into the world of finger waves, exploring their rich history, demystifying the techniques, and offering practical advice for achieving this stunning look at home. We'll uncover the secrets behind creating those defined 'S' shapes, discuss the essential tools and products, and provide inspiration for various hair types and styles. Get ready to transform your mane into a masterpiece of liquid elegance, embodying the timeless charm that only finger waves can provide.
Table of Contents
- What Exactly Are Finger Waves?
- A Ripple Through Time: The History of Finger Waves
- Finger Waves vs. Marcel Waves and Croquignole Curls
- The Essential Toolkit for Finger Waves
- The Art of Sculpting Finger Waves: A Step-by-Step Guide
- Finger Waves on Natural Hair: A Celebration of Versatility
- Modern Twists on a Classic Style
- Expert Tips for Perfecting Your Finger Wave Technique
What Exactly Are Finger Waves?
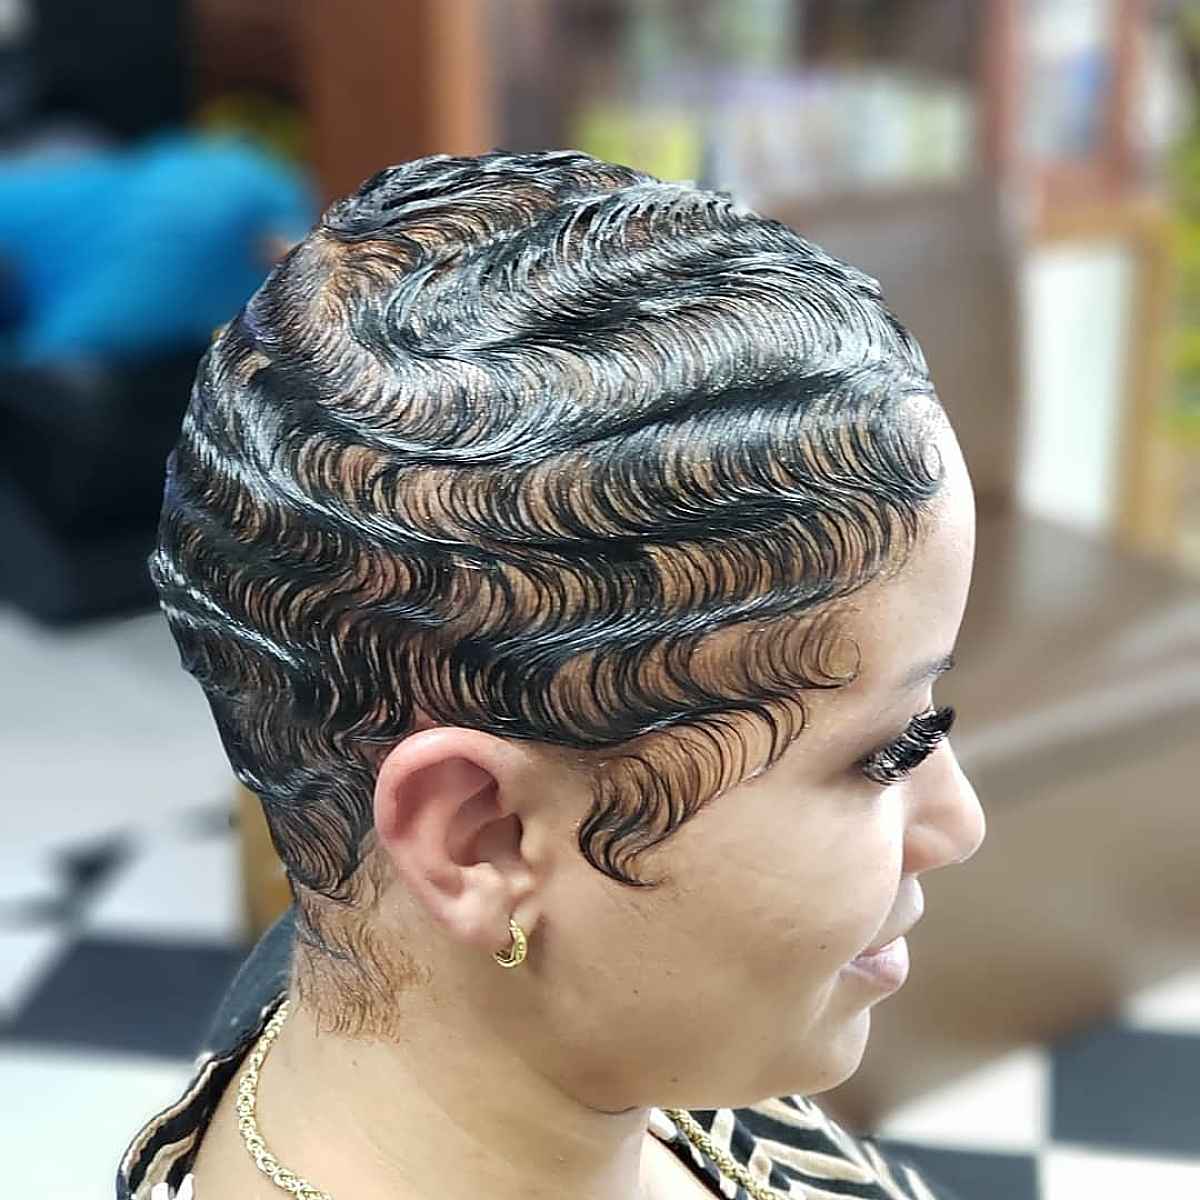
At its core, a finger wave is a structured, wavy hairstyle characterized by deep, defined 'S'-shaped patterns that lie flat against the head. Unlike traditional curls that spring outwards, finger waves create a sleek, undulating surface, giving the hair a liquid, almost sculpted appearance. This distinctive look is achieved by manipulating wet hair with fingers and a comb, pushing it into curves and securing it until dry. The result is a series of interconnected waves that flow seamlessly across the scalp, exuding an air of polished sophistication.
These waves, when dried without being disturbed, will fall into deep, uniform patterns. The beauty of finger waves lies in their precision and the way they frame the face, highlighting features with their elegant lines. It's a style that demands attention, not through volume, but through its intricate, artistic design. What better way to complete your glamour look than with beautifully shaped strands and a powerful statement?!
A Ripple Through Time: The History of Finger Waves
Finger waves are a classic, glamorous style dating back to the 1920s. This technique was incredibly popular during the Jazz Era and the flapper movement of the 1920s and 1930s. As women embraced shorter hairstyles like bobs, the finger wave provided a sophisticated and stylish way to adorn them. Flapper girls would often wear this hairstyle to give themselves a very glamorous look, perfectly complementing their daring fashion choices and vibrant social lives.
Stars like Josephine Baker and Bette Davis made finger waves a part of their signature look, cementing their status as a symbol of elegance and Hollywood glamour. Primarily, they were associated with the jazz era’s flapper style, embodying the spirit of liberation and modernity. The technique was a staple in salons, requiring skilled hands to create the perfect 'S' patterns that became synonymous with the era's chic aesthetic.
After their initial boom, the popularity of finger waves waned somewhat, but like many iconic styles, they made a significant comeback. Then, it reemerged in the 90’s as a popular style for black hair, offering a sleek and refined option that beautifully complemented natural textures. More recently, the finger wave style used to be reserved for fancy dress parties but it has recently had a resurgence and is now worn to lots of red carpet events, fashion shows, and even as a sleek choice for formal and casual gatherings for anyone trying to embrace retro or vintage vibes. Finger waves are officially back, proving their timeless appeal.
Finger Waves vs. Marcel Waves and Croquignole Curls
While finger waves are often confused with other wavy or curly hairstyles, it's crucial to understand their distinct characteristics. The most common confusion arises with the Marcel wave. Finger waves are similar to the Marcel wave in appearance, making them easily mistaken for one another. However, there's a fundamental difference: finger waving differs from Marcel waving in that there are no heated irons used on the hair for traditional finger waves. Unlike finger waves, the Marcel wave is made with a hot curling iron, and is therefore more permanent than finger waves, relying on heat to set the curl. This makes finger waves a gentler option for the hair, as it avoids heat damage.
Another hairstyle often confused with finger waves is the croquignole method of curling hair, which is used to create a permanent wave (perm). The croquignole method involves winding hair from the ends to the scalp, creating tight, spiral curls, typically with the aid of chemicals for a lasting effect. While both create waves, the technique, tools, and permanence are vastly different from the fluid, sculpted 'S' patterns of finger waves. Understanding these distinctions helps appreciate the unique artistry of the finger wave technique.
The Essential Toolkit for Finger Waves
To embark on your finger waving journey, having the right tools and products is paramount. These items will help you achieve the defined, long-lasting waves you desire, whether you're working on short, long, curly, or straight hair. Learn how to do finger waves at home with these essentials:
- Fine-Tooth Comb: A crucial tool for precise parting and sculpting the 'S' shape.
- Setting Lotion, Mousse, or Gel: Apply mousse or gel for sculpting. These products are vital for providing the hold and definition needed for the waves to set properly. The choice depends on your hair type and desired hold. For finer hair, a lighter mousse might suffice, while thicker or more resistant hair might benefit from a strong-hold gel or setting lotion.
- Finger Wave Clips: These specialized clips (often duckbill or single-prong clips) are designed to hold the waves in place without leaving dents. You'll need plenty of these to secure each curve.
- Spray Bottle with Water: To keep hair damp throughout the process, as finger waves are best created on wet hair.
- Hair Dryer (with diffuser) or Hooded Dryer: For drying the hair once the waves are sculpted. A hooded dryer is ideal as it provides even, gentle heat, minimizing disturbance to the waves.
- Hair Net or Scarf: To protect the waves while drying and sleeping.
As Alvarez’s recommendations suggest, selecting the right product based on hair texture is key. For natural hair, a good quality gel or setting foam that offers strong hold without flaking is essential to define the waves and combat frizz.
The Art of Sculpting Finger Waves: A Step-by-Step Guide
Creating beautiful finger waves hair requires patience and practice, but the results are incredibly rewarding. As a cosmetology instructor, many of my students really struggle with finger waves, so I decided to simplify the process for beginners. Here's a detailed, step-by-step guide on how to create finger waves:
Preparation is Key
- Start with Freshly Washed Hair: Finger waves are best created on clean, damp hair. Ensure your hair is thoroughly washed and conditioned.
- Towel Dry Gently: Your hair should be damp, not dripping wet. Excess water can dilute your styling product and make it harder to hold the shape.
- Apply Sculpting Product: Generously apply your chosen mousse, gel, or setting lotion evenly throughout the section of hair you'll be working on. This product is what will give the waves their hold and definition. Ensure even distribution for consistent results.
- Part Your Hair: Decide on your desired parting. A side part often works well for classic finger waves, allowing the waves to flow gracefully across the forehead.
Sculpting the 'S' Shape
This is where the magic happens. You'll be working in small sections, typically starting from your parting and working downwards.
- Form the First Ridge: Place your index finger (or middle finger) firmly on the hair, about an inch or two from the parting. With your comb, push the hair upward towards your finger, creating a ridge. This is the first curve of your 'S' wave.
- Secure the Ridge: While keeping your finger in place to hold the ridge, use a finger wave clip to secure the base of this newly formed wave. Place the clip along the ridge, parallel to your finger, to hold the hair in its upward curve.
- Create the Valley: Move your finger about an inch or so below the first ridge. Now, using your comb, push the hair downwards, away from the first ridge, creating the bottom curve of the 'S' shape. This forms a "valley" or depression.
- Secure the Valley: Again, secure this new curve with another finger wave clip, placed parallel to your finger, holding the hair in its downward curve.
- Alternate and Repeat: Continue this process, alternating between pushing your hair upwards or downwards, which is how to do the finger wave rows. Each upward push creates a ridge, and each downward push creates a valley. Secure each row with a clip before shaping the next wave in the opposite direction. The key is to keep your finger firmly against the scalp to guide the comb and maintain tension, ensuring defined waves.
- Work Across the Head: Continue this technique across your head, section by section, until all desired areas are covered in waves. For a striking statement, one large wave for your bangs is an easy and showy way to rock finger waves.
Securing and Drying for Perfection
- Check Your Work: Once all waves are sculpted and clipped, gently examine them to ensure they are even and well-defined. Add more clips if necessary to hold any loose sections.
- Dry Thoroughly: This is a critical step. The waves must be completely dry before you remove the clips. You can air dry (which takes longer but is gentlest), use a hooded dryer for even drying, or a hair dryer with a diffuser on a low, cool setting. Avoid disturbing the waves while drying. These waves, when dried without being disturbed, will fall into deep waves.
- Remove Clips Gently: Once hair is 100% dry, carefully remove each clip. Do not pull or drag them, as this can disrupt the wave pattern.
- Finish and Set: You can lightly mist with hairspray for extra hold, but often the setting product used initially is enough. Avoid brushing or combing, as this will flatten the waves. You can gently separate them with your fingers if desired.
Finger Waves on Natural Hair: A Celebration of Versatility
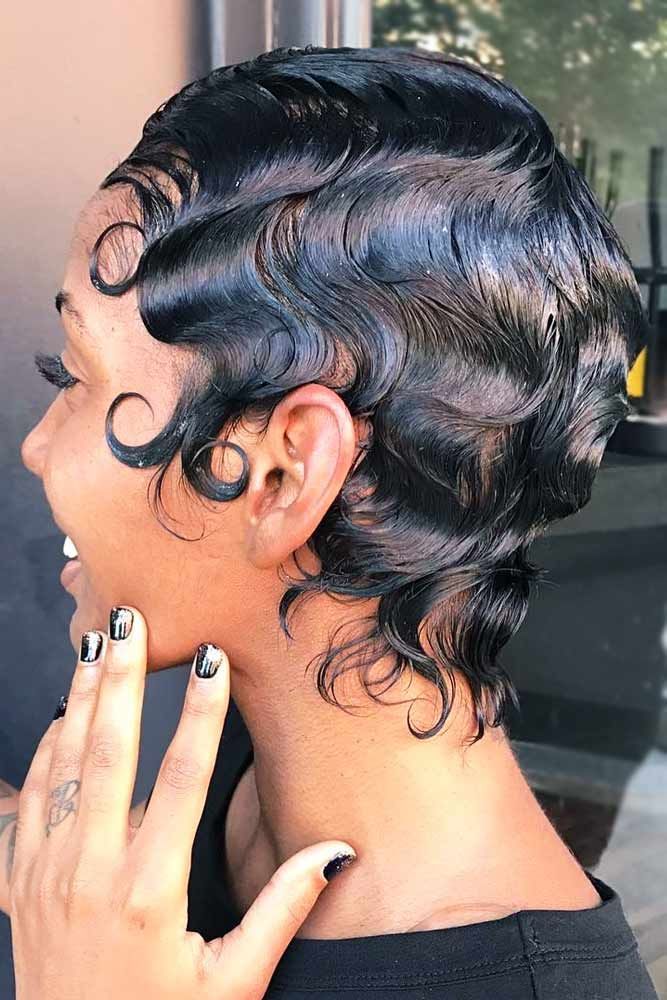
Can you do finger waves on natural hair? Absolutely! Finger waves on natural hair are not only possible but also incredibly stunning. The texture and resilience of natural hair can beautifully hold the intricate 'S' patterns, offering a unique blend of vintage glamour and contemporary style. Finger waves hairstyles for Black women have seen a significant resurgence, showcasing the versatility and beauty of textured hair.
Finger waves are not limited to one way of styling; it simply involves using styling tools and products to create a sea of waves on your mane. Here's a complete guide plus simple finger wave styles to inspire you, especially for natural hair:
- Product Choice is Key: For natural hair, a strong-hold, non-flaking gel or setting foam is crucial. Look for products that provide excellent definition and shine without leaving residue.
- Moisture Balance: Ensure your natural hair is well-moisturized before applying styling products. This helps prevent dryness and flaking once the waves set.
- Stretch or Blow Dry (Optional): For some natural hair textures, lightly stretching or blow-drying the hair on a cool setting before styling can make the waving process easier and result in smoother waves. However, it's not always necessary, as finger waves can be done directly on wet, shrunken hair too.
- Cornrowed Finger Waves: This is a fun braid design that mixes waves from the Roaring 20s era and braids. A stunning design is executed with small scalp braids and precise hair parting, techniques held by experienced hair braiders. This fusion creates a truly unique and intricate look.
- Adding Color: Have fun with the finger wave style by adding some color braid hair, too! This can introduce a vibrant, modern twist to the classic design.
- Inspired Styles: While contemplating how you want your finger waves to look, below are easy finger wave styles on natural hair to inspire you. These can range from full-head waves to partial waves framing the face, or even incorporating braids and twists into the overall design.
The structured nature of finger waves beautifully complements the natural volume and texture of Black hair, creating a look that is both elegant and bold. What better way to round off your glam ensemble than with expertly sculpted strands and a striking statement?
Modern Twists on a Classic Style
While finger waves are rooted in the past, their adaptability allows for numerous modern interpretations. They've transcended their historical origins to become a sleek choice for formal and casual gatherings. Finger waves are the first to pop up whenever thinking of elegant hairstyles, and their versatility is a testament to their enduring appeal.
- Subtle Side Waves: Instead of a full head of waves, consider a single large wave for your bangs or a few waves along one side of your face, paired with a sleek bun or ponytail. This offers a hint of vintage glamour without being overwhelming.
- Textured Waves: While traditional finger waves are smooth, a slightly more textured or softer wave can give a modern, undone feel while retaining the classic 'S' shape.
- Accessorized Waves: Embellish your finger waves with modern hair accessories like delicate hairpins, jeweled clips, or even a chic headband to elevate the look.
- Color Play: As mentioned, integrating vibrant hair colors or highlights can give finger waves a contemporary edge, making them pop even more.
- Blended Styles: Combine finger waves with other styles, such as a sleek low bun, a braided updo, or even loose curls at the back, to create a unique hybrid look.
Finger waves are a minimalist yet elegant hairdo. Like sleek ponytails and classic bobs, they’ve always been stunning, proving that true style never fades. By making just a few turns with your curling iron (for specific sections like bangs, as a modern interpretation, not for the traditional finger wave technique itself), you can create a stunning vintage style that feels fresh and relevant today. Learn how to create fabulous 1920's style vintage finger waves using heated hot rollerset for a softer, more voluminous take on the classic.
Expert Tips for Perfecting Your Finger Wave Technique
Mastering finger waves can be challenging, even for seasoned hairdressers. Hairdressing legend and Bumble and Bumble Global Artistic Director Laurent Philippon (@laurentphilippon) says he’s spent his entire career refining the technique. Here are 5 tips to perfect your finger wave technique, drawing on expert insights:
- Keep Hair Consistently Wet: The hair must remain damp throughout the entire sculpting process. If it starts to dry, mist it lightly with water from your spray bottle. Dry hair will not hold the 'S' shape effectively.
- Use Enough Product: Don't be shy with your mousse or gel. The product is what gives the waves their structure and hold. Ensure every strand you're working with is thoroughly coated.
- Firm, Consistent Pressure: Your fingers must maintain firm, consistent pressure against the scalp as you guide the comb. This tension is what creates the sharp, defined ridges and valleys.
- Angle of the Comb: Hold your comb at a slight angle (around 45 degrees) to the scalp when pushing the hair. This helps to create a cleaner, more defined wave.
- Patience is a Virtue: Finger waving is a meticulous process. Take your time with each wave, ensuring it's perfectly formed and secured before moving to the next. Rushing will lead to less defined, messy waves. Remember, practice makes perfect.
These tips, combined with consistent practice, will help you achieve beautifully sculpted finger waves that truly make a statement. Remember, learning how to do finger waves at home might seem daunting at first, but with persistence, you'll soon be creating elegant, professional-looking styles.
In this article, I've taught you how to create beautiful finger waves hair by explaining in detail step by step how you can recreate this iconic look. Whether you're a beginner looking to simplify the process or an enthusiast aiming to refine your technique, the timeless appeal of finger waves makes them a worthy addition to your styling repertoire.
The journey to mastering finger waves is one of patience and precision, but the reward is a truly breathtaking hairstyle that transcends trends. From their glamorous origins in the 1920s to their modern-day resurgence, finger waves continue to capt captivate with their elegant 'S' shapes and sleek finish. By understanding the technique, utilizing the right products, and embracing the expert tips shared, you can confidently sculpt your own stunning finger waves, whether for a special event or simply to embrace a touch of vintage charm in your everyday look. This classic hairdo is more than just a style; it's a piece of art, a statement of sophistication, and a testament to the enduring power of timeless beauty.
Have you tried creating finger waves before? What were your biggest challenges or successes? Share your experiences and tips in the comments below! If you found this guide helpful, don't forget to share it with your friends who might be looking to add a touch of old-school glamour to their style. Explore more of our hair styling guides for other classic and contemporary looks!
- South Central Baddies Joce
- Richard Garcia Cpa
- Jkeaa Music
- John Madden Little Giants
- Kevin Keatts Wife