As the centerpiece of many holiday tables, a beautifully roasted turkey demands an equally impressive carving. Wondering how to carve a turkey like a seasoned pro? You've bought it, stuffed it, and cooked it to perfection, and now comes the final, crucial step before you dig in. This comprehensive guide will demystify the process, ensuring your turkey is not only delicious but also presented flawlessly, impressing every guest at your feast.
Learning how to carve a turkey is easier than you think, and mastering this skill transforms the entire dining experience. From understanding the importance of resting the bird to wielding the right tools and executing precise cuts, we'll walk you through every step. Say goodbye to awkward, messy carvings and hello to perfectly sliced, juicy turkey that makes your holiday meal truly unforgettable.
Table of Contents
- Why Proper Turkey Carving Matters
- The Golden Rule: Resting Your Turkey
- Essential Tools for Turkey Carving
- Setting Up Your Carving Station
- Step-by-Step Guide to Carving a Turkey
- Presentation and Serving Tips
- Storing Leftovers Like a Pro
- Common Carving Mistakes to Avoid
- Conclusion: Mastering the Art of Turkey Carving
Why Proper Turkey Carving Matters
Carving a turkey isn't just about getting the meat off the bone; it's about maximizing flavor, ensuring juiciness, and creating an appealing presentation. When you learn how to carve a turkey properly, you prevent the meat from drying out, especially the delicate breast meat. Improper carving can squeeze out precious juices, leaving you with dry, stringy slices that disappoint. Conversely, a well-carved turkey yields tender, succulent pieces of both dark and white meat, ready to be savored.
Beyond taste, presentation plays a significant role in the dining experience. A neatly carved turkey, with slices arranged artfully on a platter, elevates the entire meal. It shows care and expertise, making your guests feel truly special. As Ellie Logan, a butcher at Walden Local Meat, wisely puts it, “Don’t be intimidated by the size. It’s just a big chicken.” This perspective helps to simplify the task, making the process of learning how to carve a turkey feel much more approachable and less daunting.
The Golden Rule: Resting Your Turkey
Before you even think about picking up that carving knife, there's one critical step that separates the amateurs from the pros: resting the turkey. This is perhaps the most important tip you'll receive on how to carve a turkey like a pro. Once your turkey is out of the oven, resist the urge to immediately slice into it. Instead, transfer it to a cutting board and let it rest, uncovered, for a minimum of 20 to 30 minutes, or even up to an hour for larger birds.
Why is this so crucial? During cooking, the turkey's juices are pushed towards the center of the bird. If you carve it too soon, these juices will run out onto your cutting board instead of being reabsorbed back into the meat. This results in dry, less flavorful turkey. Resting allows the internal temperature to stabilize and, more importantly, gives the muscle fibers time to relax and reabsorb those precious juices. This ensures that every slice of meat remains incredibly moist and tender. Think of it as a crucial step that locks in the succulence, making all your cooking efforts truly shine.
Essential Tools for Turkey Carving
Having the right tools is fundamental to successfully learning how to carve a turkey. Just as a chef relies on specific implements for different tasks, a well-equipped carving station makes the job easier, safer, and more efficient. For this tutorial, we’re learning how to carve a turkey primarily with a knife, but a few other items will prove invaluable.
The Right Knife Makes All the Difference
The most important tool in your arsenal is a sharp knife. A dull knife is not only ineffective but also dangerous, as it requires more force and can slip. You will need a sharp knife, ideally a long carving knife or a sharp chef's knife, for clean, precise cuts. A carving knife typically has a long, thin blade, often with a pointed tip, designed specifically for slicing large roasts and poultry. Its length allows for single, smooth strokes through the meat, minimizing sawing motions that can tear the fibers.
Before you begin, ensure your knife is honed or sharpened. A few passes on a sharpening steel or a quick session with a knife sharpener will make a world of difference. A properly sharpened knife glides through the meat effortlessly, yielding beautiful, even slices. Remember, a sharp knife is a safe knife, giving you better control and reducing the risk of accidents.
Beyond the Knife: Other Crucial Tools
While the knife is king, several other tools will complete your carving station and make the process much smoother:
- Cutting Board: You will need a large, sturdy cutting board. A board with a well or groove around the edge is ideal, as it will catch any escaping juices, keeping your counter clean. Place a damp cloth or paper towel underneath the board to prevent it from slipping during carving.
- Meat Fork: A long-handled meat fork is invaluable for stabilizing the turkey while you carve. Its sturdy tines provide a firm grip, allowing you to hold the bird steady with one hand while you cut with the other.
- Kitchen Shears: These can be incredibly useful for removing trussing strings, cutting through small bones, or even snipping off stubborn bits of skin. They offer precision and control where a knife might be cumbersome.
- Tongs: Tongs are excellent for handling the carved meat, transferring slices from the cutting board to the serving platter without touching them directly. This helps maintain hygiene and presentation.
- Serving Platter: Have your serving platter ready and warmed, if possible. This allows you to immediately transfer the carved meat, keeping it warm and ready for the table.
- Paper Towels: Keep a roll of paper towels nearby for quick clean-ups of juices or grease, maintaining a tidy workspace.
With these tools at the ready, you're well-prepared to tackle the turkey with confidence and ease. The right equipment is a significant part of mastering how to carve a turkey like a pro.
Setting Up Your Carving Station
A well-organized carving station makes the process smooth and efficient. Before you even bring the turkey out of its resting spot, take a few moments to set up your area. This preparation is key to learning how to carve a turkey with minimal fuss.
First, choose a spacious and sturdy surface, such as a large kitchen counter or a dedicated carving board. Place your large carving board on this surface, ensuring it's stable and won't slide around (a damp cloth underneath helps). Make sure you have your serving platter, paper towels, a sharp chef's knife or carving knife, and tongs at the ready. Arrange them ergonomically so everything is within easy reach. If the turkey was trussed, remove the trussing string if needed using the tip of your knife or kitchen shears. Then, arrange the turkey on the carving board so the legs are facing you. This initial setup provides a clear, clean, and safe workspace, allowing you to focus entirely on the carving process.
Step-by-Step Guide to Carving a Turkey
Now that your turkey is rested and your station is set, it's time to learn the practical steps of how to carve a turkey. Remember, with our guidance, neatly carving a turkey is easy. Food stylist Barrett Washburne shares all his best tips, and we've distilled them into simple, actionable steps. You'll learn how to carve a turkey to save every bite and impress your guests with your beautifully carved turkey.
Detaching the Legs and Thighs
Start with the dark meat, as it's often easier to maneuver the turkey when the legs are removed first. This is a crucial first step in learning how to carve a turkey efficiently.
- Step 1: Locate the Joint. Grasp the end of one drumstick. Place your long carving knife between the drumstick/thigh and the body of the turkey. Cut through the skin and meat toward the leg joint.
- Step 2: Disjoint. Pull the leg outward and away from the body. As you pull, you'll feel the joint loosen. Use the tip of your knife to cut through the joint, separating the entire leg (drumstick and thigh) from the turkey body. Repeat on the other side.
- Step 3: Separate Drumstick and Thigh. Place the detached leg on the cutting board. Locate the joint connecting the drumstick and the thigh. Cut through this joint to separate them. You can then slice the thigh meat off the bone or serve it whole.
Separating the Wings
Next, move on to the wings. These are relatively straightforward to remove and are a favorite for many.
- Step 1: Locate the Wing Joint. Pull one wing away from the body. You'll feel the joint.
- Step 2: Cut Through. Use your sharp knife to cut through the joint, detaching the wing. Repeat for the other wing. Wings are typically served whole or separated into flats and drumettes.
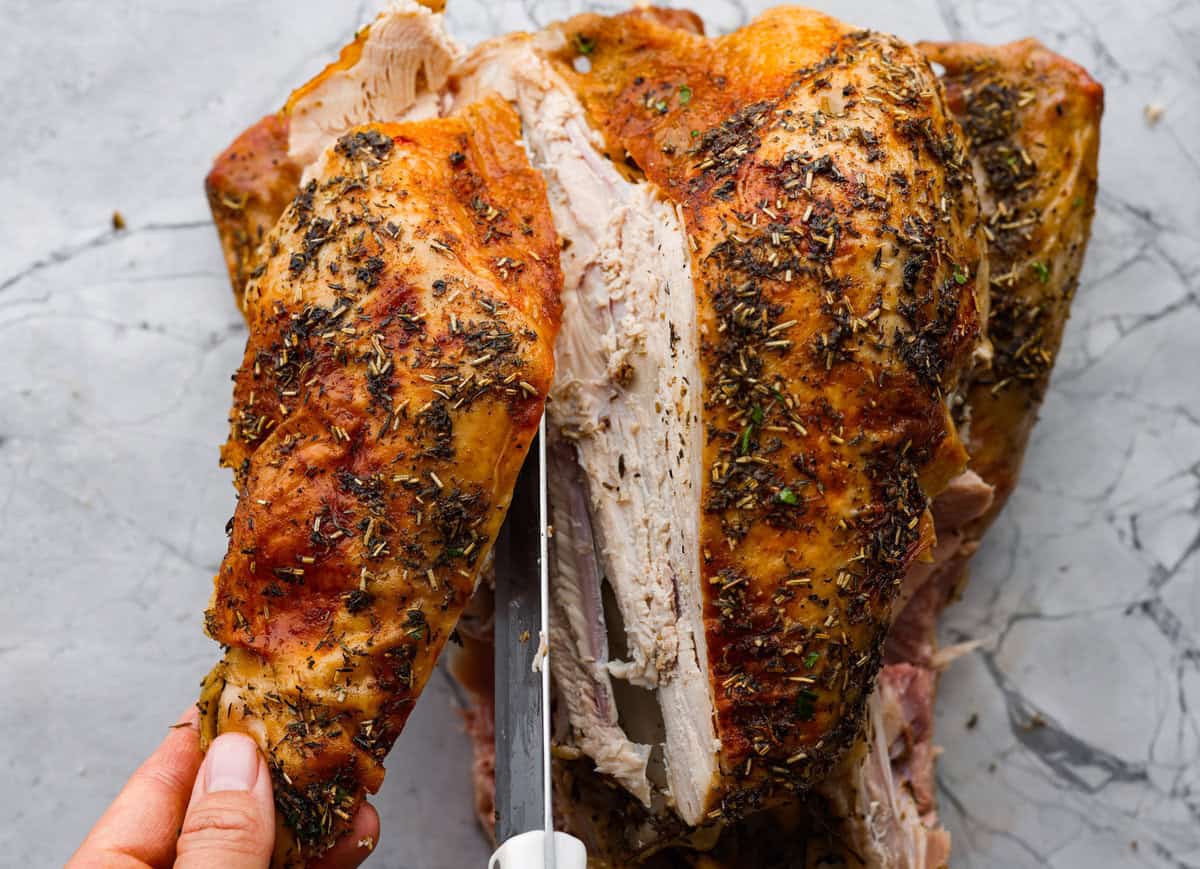
Slicing the Breast Meat
The breast is the largest and often most anticipated part of the turkey. Slicing it correctly ensures moist, even pieces. This is where your long, sharp knife truly shines when learning how to carve a turkey for white meat.
- Step 1: Find the Breastbone. With the legs and wings removed, the breast meat is exposed. Locate the breastbone (keel bone) running down the center of the turkey.
- Step 2: Make the First Cut. Place your knife along one side of the breastbone. Make a deep, long cut straight down, following the rib cage contour, until you reach the wishbone area at the front.
- Step 3: Slice Along the Rib Cage. Continue slicing downwards, keeping the knife as close to the bone as possible, following the natural curve of the rib cage. This will separate one entire breast half from the bone in a single piece. Repeat on the other side.
- Step 4: Slice the Breast. Place the whole breast half, skin-side up, on the cutting board. Slice the breast meat against the grain into uniform slices, about 1/4 to 1/2 inch thick. Slicing against the grain shortens the muscle fibers, making the meat more tender.
Handling the Drumsticks and Dark Meat
While breast meat is often sliced, drumsticks are frequently served whole. However, you can also carve them for easier eating.
- Drumsticks: Drumsticks are typically served as is. If you prefer, you can carefully slice meat off the bone, but this can be challenging due to the shape of the bone and tendons.
- Thigh Meat: Once separated from the drumstick, the thigh meat can be sliced against the grain or pulled into shreds for a more rustic presentation.
By following these simple steps, you'll learn how to carve a turkey like a pro, separating the dark and white meat efficiently and neatly. Once you've mastered a beautifully roasted and carved turkey, you'll truly nail the final step before you dig in.
Presentation and Serving Tips
Carving the turkey is only half the battle; presenting it beautifully is the final flourish that elevates your holiday meal. Once you've mastered how to carve a turkey, consider these tips for serving warm turkey that looks as good as it tastes.
As you carve, immediately transfer the slices of white and dark meat to your prepared serving platter. Arrange the slices neatly, perhaps overlapping them slightly to create an appealing visual. You can separate the white meat on one side and the dark meat on the other, or mix them for variety. For an extra touch of elegance, garnish with fresh herbs like rosemary, thyme, or sage. These not only add a pop of color but also a delightful aroma. Keep the platter warm by covering it loosely with foil or placing it in a low-temperature oven (around 150°F / 65°C) until ready to serve. This ensures the turkey remains juicy and inviting for your guests. Serving warm turkey is key to maintaining its tenderness and flavor.
Storing Leftovers Like a Pro
One of the joys of a holiday turkey is the promise of delicious leftovers. Knowing how to properly store them is just as important as knowing how to carve a turkey. Proper storage ensures food safety and preserves the quality of your hard-earned meal for days to come.
Once the meal is over and the turkey has cooled slightly, aim to get the leftovers into the refrigerator within two hours. Separate the meat from the bones and skin. Slice any remaining large pieces of meat into smaller, manageable portions. Store white and dark meat separately in airtight containers. To keep the meat moist, you can add a little bit of turkey broth or gravy to the container before sealing. Leftover turkey can be safely refrigerated for 3-4 days. For longer storage, freeze the meat in airtight containers or freezer bags for up to 3-4 months. Don't forget to save the turkey carcass for making flavorful turkey stock – a treasure for future soups and gravies!
Common Carving Mistakes to Avoid
Even with the best intentions, it's easy to make a few common errors when learning how to carve a turkey. Being aware of these pitfalls can help you avoid them and ensure a smoother, more successful carving experience.
- Carving Too Soon: As emphasized, this is the biggest mistake. If you carve it too soon, the juices will run out instead of absorbing back into the meat to make it moist. Always allow adequate resting time.
- Using a Dull Knife: A dull knife makes carving difficult, messy, and dangerous. It can tear the meat, resulting in uneven, ragged slices and potentially causing injury. Always ensure your knife is razor-sharp.
- Not Stabilizing the Turkey: Trying to carve a wobbly turkey is a recipe for frustration and potential slips. Use a sturdy cutting board and a meat fork to keep the bird firmly in place.
- Cutting with the Grain: Slicing with the grain (parallel to the muscle fibers) will result in tough, chewy meat. Always slice against the grain to shorten the fibers and ensure tender, easy-to-chew slices.
- Ignoring the Joints: Forcing your knife through bone instead of finding and cutting through the joints will create a mess and dull your knife. Take your time to locate the natural separation points.
- Over-Carving: You don't need to carve the entire turkey at once unless you're serving a very large crowd. Carve what you need for the first round of servings and leave the rest on the carcass to keep it moist. You can always carve more later.
By avoiding these common missteps, your journey to learning how to carve a turkey will be much more successful and enjoyable.
Conclusion: Mastering the Art of Turkey Carving
Carving a turkey has never been so easy, especially with the right knowledge and tools at your disposal. From understanding the vital importance of resting your bird to setting up an efficient carving station and executing precise cuts, you now have all the information needed to transform your Thanksgiving turkey into a savory spread of juicy, perfectly sliced meat. Learning how to carve a turkey is a skill that not only enhances the dining experience but also builds confidence in the kitchen.
Remember, practice makes perfect. The more you carve, the more intuitive the process will become. Don't be afraid to take your time, and enjoy the satisfaction of presenting a beautifully carved turkey to your loved ones. For more