Learning how to draw eyes is often considered one of the most challenging yet rewarding aspects of portraiture. The eyes are not merely organs of sight; they are the windows to the soul, capable of conveying a vast spectrum of emotions, depth, and character. Whether you're a complete beginner or an experienced artist looking to refine your skills, this comprehensive guide will walk you through the essential steps and insights needed to bring realistic eyes to life on your canvas. From understanding basic anatomy to mastering intricate shading techniques, we'll explore everything you need to know to transform a quick eye sketch into a captivating, lifelike drawing.
Many aspiring artists find facial features, especially the eyes, particularly daunting. It's a common struggle, but with the right approach and consistent practice, anyone can learn to draw eyes that resonate with realism and emotion. This tutorial gives you a basic look at the shapes and anatomy needed for drawing realistic eyes, providing you with a solid foundation to build upon. Remember, eye styles vary vastly, depending on whether your expertise is anime, realism, comics, doll eyes, or even just doodle, use this article as a general guide to improve your ability to draw from references and even from your imagination.
Table of Contents
- Understanding Basic Eye Anatomy and Structure
- Starting with the Basics: Shapes and Placement
- The Step-by-Step Process to Draw Eyes
- Bringing Depth to Your Drawing: Shading Techniques
- Adding Realism: Eyelashes, Eyebrows, and Highlights
- Drawing Eyes from Different Angles
- Tips to Improve Your Eye Drawing Skills
- Common Mistakes and How to Avoid Them
Understanding Basic Eye Anatomy and Structure
To draw realistic eyes, it’s essential to understand their structure. The eye is not a flat shape; it's a sphere nestled within a socket, protected by eyelids, eyelashes, and eyebrows. Understanding this three-dimensional form is crucial for giving your eyes depth and life. The main components of the eye include:- **The Eyeball:** A spherical shape, not perfectly round, but generally spherical. This is the foundation of your drawing.
- **The Iris:** The colored part of the eye. It's a disc that sits on the front of the eyeball, slightly recessed, not flat on the surface.
- **The Pupil:** The black center of the iris, which expands and contracts with light.
- **The Eyelids:** These wrap around the eyeball. The upper eyelid typically covers more of the iris than the lower one. They have thickness, which is often overlooked by beginners.
- **The Tear Duct (Lacrimal Caruncle):** The small, pinkish bump in the inner corner of the eye.
- **The Sclera:** The "white" of the eye. It's rarely pure white in a realistic drawing; it has shadows and subtle color variations.
- **The Eyebrows:** These sit above the eye socket and play a significant role in expression and framing the eye.
- **The Eyelashes:** These emerge from the eyelid's edge, curving outwards.
Starting with the Basics: Shapes and Placement
Before diving into intricate details, it's vital to establish the correct proportions and placement. The first thing to do when you start drawing eyes is to understand the basic eye shapes. This is a crucial step that sets the stage for a successful drawing.The Bounding Box and Spacing
When you begin, draw a bounding box of where you want the eyes to sit. This simple geometric shape helps you map out placement and ensures your eyes are proportionate to the rest of the face. If you want to draw eyes from a front view, this is how you start. In this case, you’ll probably want to use horizontal ovals as your initial guide for the eye shape within the box. A key principle in facial anatomy is that the spacing between eyes is generally one eye apart. So, draw an extra circle in the middle to represent this space. This helps maintain realistic proportions and prevents eyes from appearing too close or too far apart. This method is aimed to help even the most complete beginner draw something they once thought was impossible.Common Eye Shapes and What to Look Out For
While the underlying structure is consistent, eye shapes vary greatly from person to person. Some common shapes include:- **Almond Eyes:** The most common shape, with a slight upward tilt at the outer corner.
- **Round Eyes:** The iris and sclera are more visible, giving a wider, more open look.
- **Monolid Eyes:** Characterized by the absence of a crease on the eyelid.
- **Downturned Eyes:** The outer corner of the eye points downwards.
- **Upturned Eyes:** The outer corner of the eye points upwards.
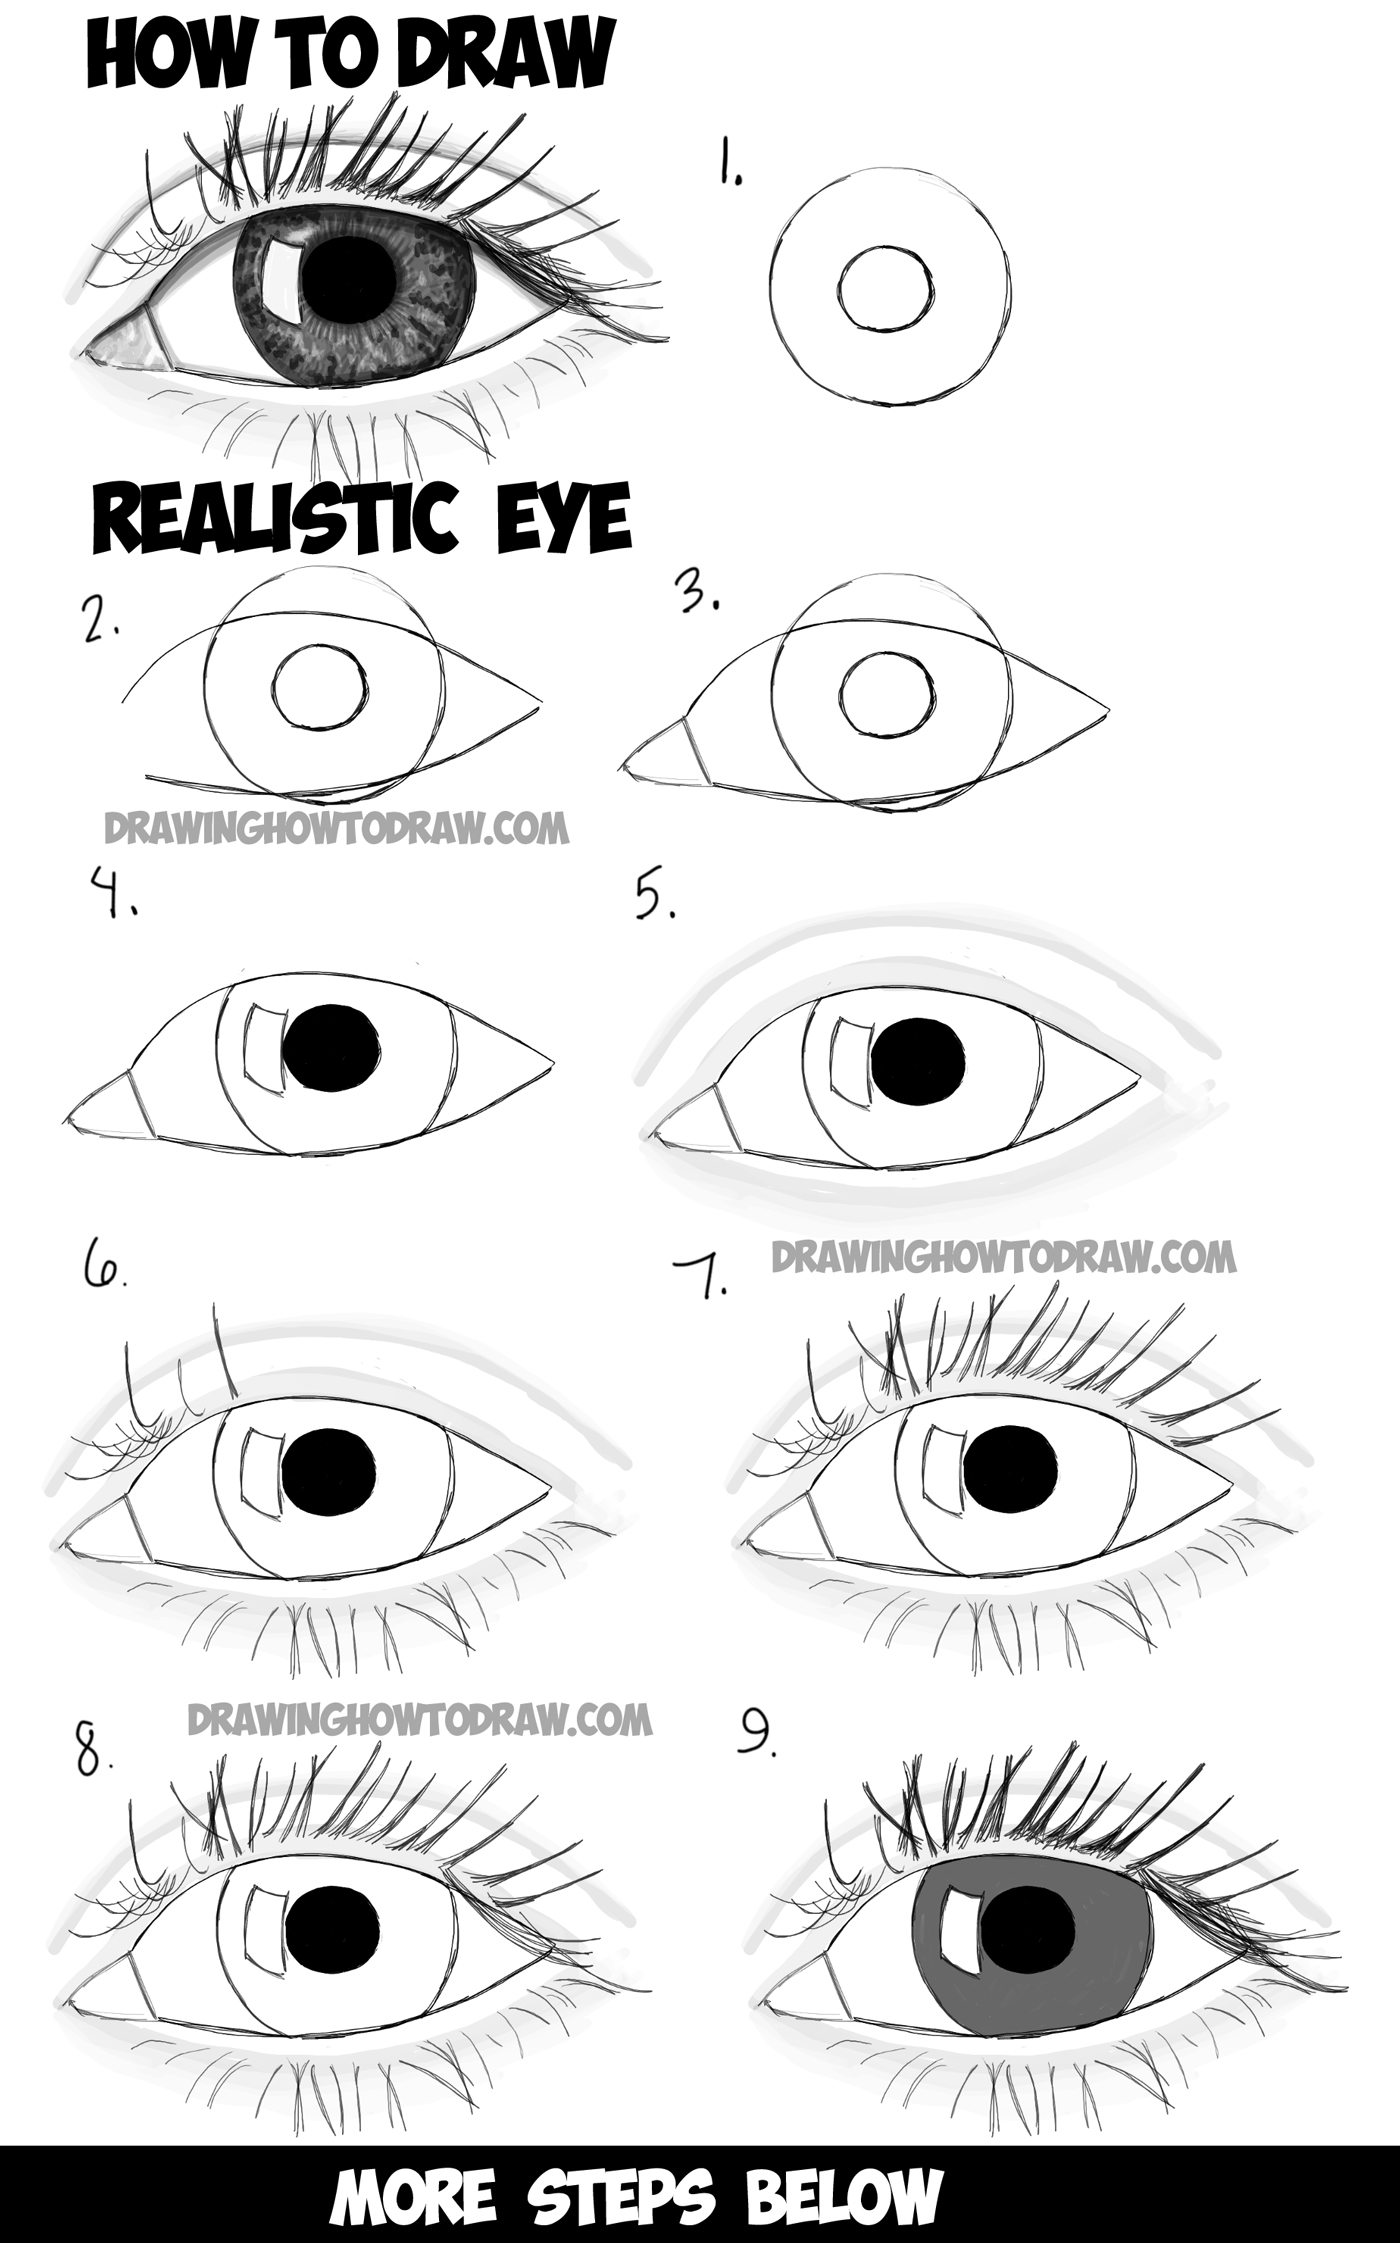
The Step-by-Step Process to Draw Eyes
This tutorial shows an easy way to draw a realistic looking eye in nine steps, but it can be simplified into core phases. My method is aimed to help even the most complete beginner draw something they once thought was impossible. It is fairly simple but may take a few tries to get right, so keep trying! Learn how to draw a realistic eye with pencil using easy step by step instructions. Here are the basic steps to drawing eyes:- **Sketch the Bounding Box and Sphere:** Start with a light sketch of the bounding box and the spherical form of the eyeball within it. This establishes your foundation.
- **Outline the Eyelids:** Lightly sketch the upper and lower eyelids, remembering their thickness. The upper lid should cover a small portion of the iris.
- **Place the Iris and Pupil:** Draw the iris as a circle within the eye, ensuring it's slightly cut off by the eyelids. Then, draw the pupil as a perfect circle in the center of the iris.
- **Add the Tear Duct:** Sketch the small tear duct in the inner corner of the eye.
- **Define the Creases and Folds:** Add the crease above the upper eyelid and any subtle folds beneath the lower lid. These contribute to the eye's form.
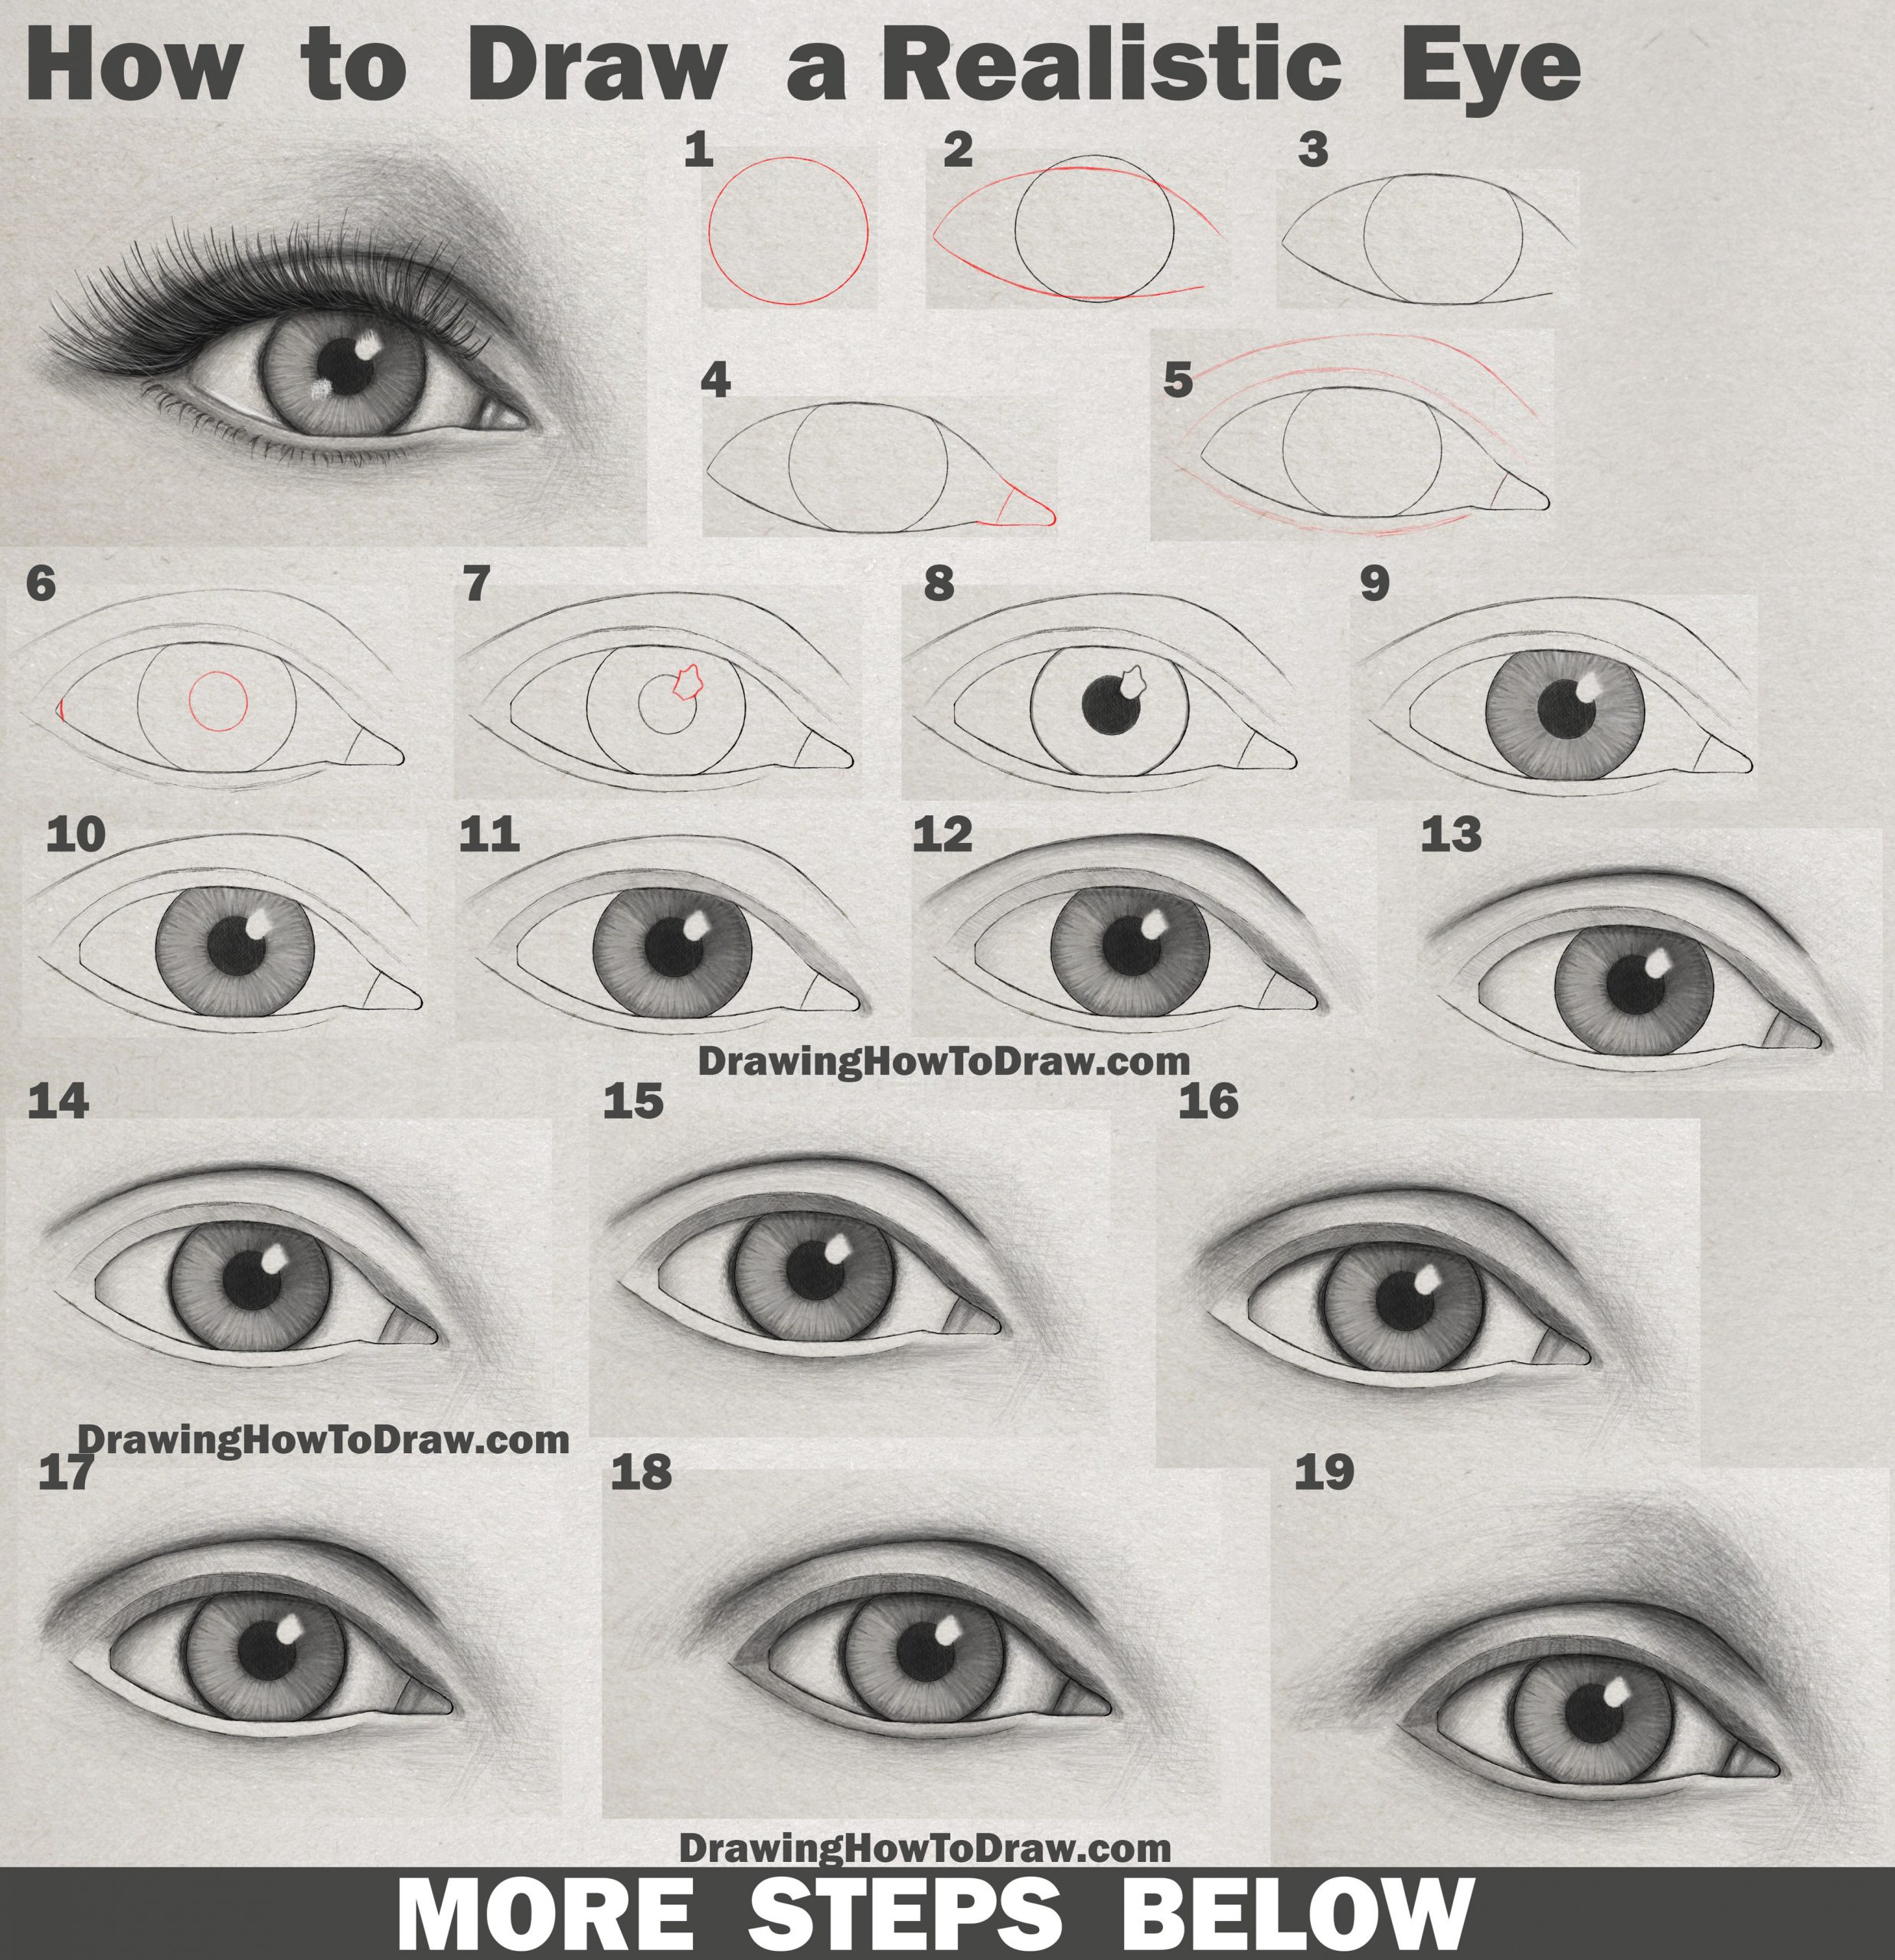
- **Initial Shading for Form:** Begin applying very light shading to establish the overall form of the eyeball and the areas around it. This helps to make it look three-dimensional.
- **Refine the Iris and Pupil:** Add initial details to the iris, such as radial lines and a darker outer ring. Darken the pupil to its deepest black.
- **Sketch Eyebrows and Eyelashes:** Lightly draw the general shape of the eyebrow and the direction of the eyelashes.
- **Begin Detailed Shading and Blending:** This is where the magic happens. Gradually build up your values, focusing on light, shadow, and texture.
Bringing Depth to Your Drawing: Shading Techniques
Shading is what transforms a flat outline into a three-dimensional, lifelike eye. This tutorial covers shading, blending, highlights, and more. Find out how to give your eyes depth and life with this detailed tutorial.Mastering Light and Shadow
Understanding how light interacts with the eye's spherical form is paramount. The eyeball itself is a sphere, so it will have a core shadow, a highlight, and reflected light. The eyelids cast shadows onto the eyeball, and the area around the eye (the eye socket) also has distinct light and shadow patterns. When you learn how to draw eyes, pay close attention to:- **The Sclera (White of the Eye):** It's rarely pure white. It will have shadows from the eyelids and the general curvature of the eyeball. The area near the tear duct and the outer corner might be slightly darker.
- **The Iris:** The iris is not flat. It's slightly concave, like a dish. This means it will have a subtle shadow around its edges and a highlight where light hits it directly. The pupil, being a hole, will be the darkest point.
- **Highlights:** These are crucial for making the eye look wet and alive. Place a distinct, sharp highlight on the iris and sometimes a smaller one on the tear duct. These highlights should reflect the light source.
Gradual Layering and Blending
Achieving smooth, realistic shading requires patience and a systematic approach. Gradually apply more layers of strokes to darken and smooth out the shading of the eyelids/around eyes areas until you bring it to the level that you want to have in the finished drawing. Techniques to employ:- **Layering:** Start with light pressure and gradually build up darker values by adding more layers of graphite. This allows for smooth transitions and prevents harsh lines.
- **Blending:** Use a blending stump, tissue, or cotton swab to smooth out graphite and create seamless transitions between values. Be careful not to over-blend, as this can make your drawing look flat.
- **Varying Pressure:** Control the darkness of your strokes by varying the pressure you apply to your pencil.
- **Cross-hatching/Hatching:** For texture and darker values, use short, overlapping lines.
Adding Realism: Eyelashes, Eyebrows, and Highlights
These details are the finishing touches that truly bring your eye drawing to life. This tutorial covers shading, blending, highlights, eyebrows, eyelashes and more. * **Eyelashes:** Eyelashes are not just straight lines. They grow in clumps, curve outwards, and vary in length and thickness. * On the upper lid, they typically sweep upwards and outwards, often longer and denser towards the outer corner. * On the lower lid, they are usually shorter, sparser, and sweep downwards. * Remember they emerge from the eyelid's *thickness*, not directly from the edge. Add some of these thicker or darker while and others thinner or lighter to create variety and realism. * **Eyebrows:** Eyebrows frame the eye and significantly contribute to expression. * Add in more strokes into the eyebrows, following the natural direction of hair growth. * Observe how the hair changes direction along the brow arch. * Vary the pressure to create individual hairs that are thicker or darker, and others thinner or lighter. Don't draw them as a solid block. * **Highlights:** These are the "spark" in the eye. * They are the brightest spots and should be sharp and clean. * Place them strategically based on your light source. A primary highlight on the iris and a smaller one on the tear duct are common. * Use an eraser (a kneaded eraser or a precise stick eraser) to lift graphite and create these bright spots. These elements, when rendered carefully, make a profound difference in the perceived realism and emotion of your eye drawing.Drawing Eyes from Different Angles
While drawing eyes from a front view is a great starting point, mastering different angles adds versatility to your portraits. The principles of anatomy and shading remain the same, but their appearance shifts. * **Side View (Profile):** From the side, the spherical nature of the eyeball becomes more apparent. The eyelids wrap around the sphere, and the eyelashes will appear shorter as they recede into perspective. The tear duct might be less visible or completely hidden. * **Three-Quarter View:** This angle offers a dynamic perspective, showing both the front and side of the eye. The eye closest to the viewer will appear slightly larger due to perspective. Pay attention to how the eyelids foreshorten and how the iris and pupil appear as ellipses rather than perfect circles. * **Looking Up/Down:** When the eye looks up, more of the lower sclera might be visible, and the upper eyelid will cover more of the iris. Conversely, when looking down, more of the upper sclera might be visible, and the lower eyelid will cover more of the iris. Practice drawing eyes from various reference pictures to understand how perspective affects their appearance. This will allow you to not only be able to draw eyes from your imagination but also improve your ability to draw from references.Tips to Improve Your Eye Drawing Skills
Learning how to draw eyes is a journey, not a destination. Here are some useful tips to enhance your skills: * **Use Reference Pictures:** The most important thing when drawing realistic eyes is to have a reference picture. Keep one near you at all times. High-quality photos provide invaluable information about light, shadow, texture, and individual variations. * **Practice Daily:** Consistency is key. Even short daily drawing sessions can lead to significant improvement over time. It is fairly simple but may take a few tries to get right, so keep trying! * **Focus on the Overall Form First:** Don't get lost in details too early. Establish the basic shapes and structure before adding eyelashes or iris patterns. By going from basics to specifics, you can set up a good structure for your drawing. * **Observe Real Eyes:** Pay attention to the eyes of people around you. How do they express emotion? How does light catch their surface? How do the eyelids fold? * **Experiment with Materials:** Try different pencils (H, HB, B, 2B, 4B, 6B), blending tools, and paper types to see what works best for you. * **Don't Be Afraid to Erase:** Drawing is an iterative process. Erasers are tools for shaping and refining, not just correcting mistakes. Use a kneaded eraser to lift light values and a stick eraser for sharp highlights. * **Watch Other Tutorials:** Make sure to watch my other tutorials on facial features to broaden your understanding of portraiture. There isn’t just one single method of drawing anything, but there are a few tips and tricks that can be very useful toward developing and improving your own technique and approach. * **Patience and Persistence:** Realistic drawing takes time. Don't get discouraged if your first few attempts aren't perfect. Keep trying!Common Mistakes and How to Avoid Them
Even experienced artists make mistakes, but being aware of common pitfalls can help you avoid them when you learn how to draw eyes. * **Drawing the Sclera Too White:** The "whites" of the eyes are rarely pure white. They have shadows from the eyelids and the general curvature of the eyeball. Leaving them pure white makes the eye look flat and unrealistic. * *Correction:* Add subtle grey tones and shadows to the sclera, especially under the upper eyelid and in the corners. * **Making the Iris and Pupil Too Flat:** The iris is a disc that sits on the front of the eyeball, slightly recessed. The pupil is a hole. Drawing them as flat circles on the surface removes depth. * *Correction:* Shade the iris to show its concave form, with a darker ring around its edge and subtle light variations. Ensure the pupil is the darkest point. * **Incorrect Eyelash Placement and Direction:** Drawing eyelashes as uniform, straight lines directly from the eyelid's edge is a common error. * *Correction:* Remember eyelashes emerge from the *thickness* of the eyelid, grow in clumps, and curve outwards. Vary their length, thickness, and direction. * **Lack of Eyelid Thickness:** Overlooking the thickness of the eyelids makes the eye appear paper-thin and unrealistic. * *Correction:* Always indicate the slight thickness of both the upper and lower eyelids, especially where they meet the eyeball. * **Ignoring the Eye Socket:** The eye sits within a bony socket, which creates subtle shadows and forms around the eye. * *Correction:* Pay attention to the subtle planes and shadows around the eye, extending to the brow bone and cheekbone, to integrate the eye realistically into the face. * **Over-Blending:** While blending is essential, over-blending can remove texture and make your drawing look muddy or flat. * *Correction:* Blend sparingly and strategically. Allow some pencil strokes to remain visible to add texture, especially for skin and eyebrows. * **Lack of Reference:** Trying to draw a realistic eye purely from imagination, especially as a beginner, often leads to generic or inaccurate results. * *Correction:* Always use a high-quality reference picture. It provides the crucial details and proportions needed for realism. By being mindful of these common errors, you can significantly improve the realism and quality of your eye drawings.How does it feel to have a finished realistic eye drawing? It's incredibly satisfying, isn't it? That was my guide on how to draw eyes, from a quick eye sketch to a realistic eye drawing. I hope you enjoyed my step by step eye drawing tutorial. Remember, eyes often symbolize vision, enlightenment, awareness, prophecy, and omnipresence, making them a powerful subject to master in art.
This tutorial is designed to provide a simplified guide you should follow when trying to reproduce the perfect sketch of the eyes. All you need to do are 5 steps to get the basic structure down, and then we’ll shade the drawing to make it look realistic. The journey of learning how to draw eyes is a continuous one of observation, practice, and patience. Don't be discouraged by initial attempts; keep trying, keep observing, and keep refining your technique. Your realistic eye drawing is done!
What aspects of drawing eyes do you find most challenging, or what breakthroughs have you experienced? Share your thoughts and progress in the comments below! Don't forget to explore our other tutorials on facial features and portraiture to further enhance your artistic journey. Happy drawing!
- Rachel Bogle Miss Universe
- Genes Nursery
- Noritz America Corporation
- Rap Snacs
- Priced Right Heating And Cooling