Are you captivated by the vibrant beauty of hibiscus flowers and eager to bring them to life on paper? This comprehensive guide to hibiscus drawing will unlock your artistic potential, transforming your blank page into a canvas bursting with tropical charm.
Whether you're a complete beginner taking your first steps into floral art or an experienced artist looking to refine your techniques, we'll walk you through every stage. From the initial light sketches to adding vibrant colors and intricate details, our aim is to make your hibiscus drawing journey both enjoyable and immensely rewarding. Prepare to discover the simple steps that lead to stunning results.
Table of Contents
- The Allure of the Hibiscus Flower: More Than Just a Bloom
- Essential Tools for Your Hibiscus Drawing Adventure
- Getting Started: Laying the Foundation for Your Hibiscus Drawing
- Step-by-Step Guide to Drawing a Realistic Hibiscus Flower
- Bringing Your Hibiscus Drawing to Life with Color
- Tips for Elevating Your Hibiscus Drawing Skills
- Beyond the Page: Creative Uses for Your Hibiscus Drawing
- Conclusion: Your Journey into Floral Artistry
The Allure of the Hibiscus Flower: More Than Just a Bloom
Before we delve into the mechanics of how to draw a hibiscus flower, let's take a moment to appreciate these magnificent blooms. Hibiscus are renowned for being showy, ornamental, and brightly colored flowers. While most varieties are tropical, thriving in warm climates, some hardy species can surprisingly survive mild temperate winters, making them a versatile choice for gardeners worldwide. Their striking appearance, often featuring large, trumpet-shaped petals and a prominent central stamen, makes them a captivating subject for any artist.
- Rachel Bogle Miss Universe
- Toxic People Memes
- 5000cc Boobs
- Beetle Cars With Daisy Rims
- Playboi Carti Spotify Pfp
Beyond their visual appeal, hibiscus flowers hold a special place in many cultures, symbolizing beauty, glory, and hospitality. Gardeners treasure them not only for their spectacular blooms but also for their ecological role; they are magnets for hummingbirds and butterflies, bringing life and movement to any garden. Understanding these cool features and the cultural significance of hibiscus can add a deeper layer of appreciation and inspiration to your hibiscus drawing, allowing you to capture not just their form but also their essence.
Essential Tools for Your Hibiscus Drawing Adventure
Embarking on a hibiscus drawing project doesn't require an extensive art studio. In fact, you can create beautiful pieces with just a few basic materials. The key is to feel comfortable with your tools and not be afraid to experiment. Here’s what you’ll need:
- Pencils: A good quality graphite pencil (HB or 2B is ideal for sketching) is your best friend when you first start. It allows you to make light, loose lines and, crucially, to make mistakes without stressing about it. Remember, as many experienced artists will tell you, never be shy about erasing!
- Paper: Any drawing paper will do for practice. As you get more confident, you might explore papers with different textures, which can affect how your colors blend.
- Eraser: A kneaded eraser or a vinyl eraser is essential for correcting mistakes and also for lifting graphite to create highlights.
- Coloring Mediums:
- Colored Pencils: Excellent for detailed work and layering colors to achieve depth. You can easily blend them to create smooth transitions.
- Markers: Great for bold, vibrant colors and clean outlines. They offer a different aesthetic and can make your hibiscus drawing pop.
- Watercolors/Acrylics: For those looking to explore painting, these mediums can capture the fluid beauty of the hibiscus beautifully.
- Reference Images: While not strictly a tool, having a few good reference photos of hibiscus flowers can be incredibly helpful. Pay attention to the different styles and colors, the way the petals overlap, and the structure of the stamen.
Getting Started: Laying the Foundation for Your Hibiscus Drawing
Getting started with hibiscus drawing can feel like a fun challenge, especially for beginners. The process becomes much easier when broken down into simple, manageable steps. These flowers have a unique shape that catches the eye, and with a solid foundation, you’ll be well on your way to creating stunning artwork.
- Grease Bags Shark Tank Net Worth
- 8779 Wurzbach Rd
- Cores Australia
- All American Glass Fresno California
- Anita Sadowska Nude
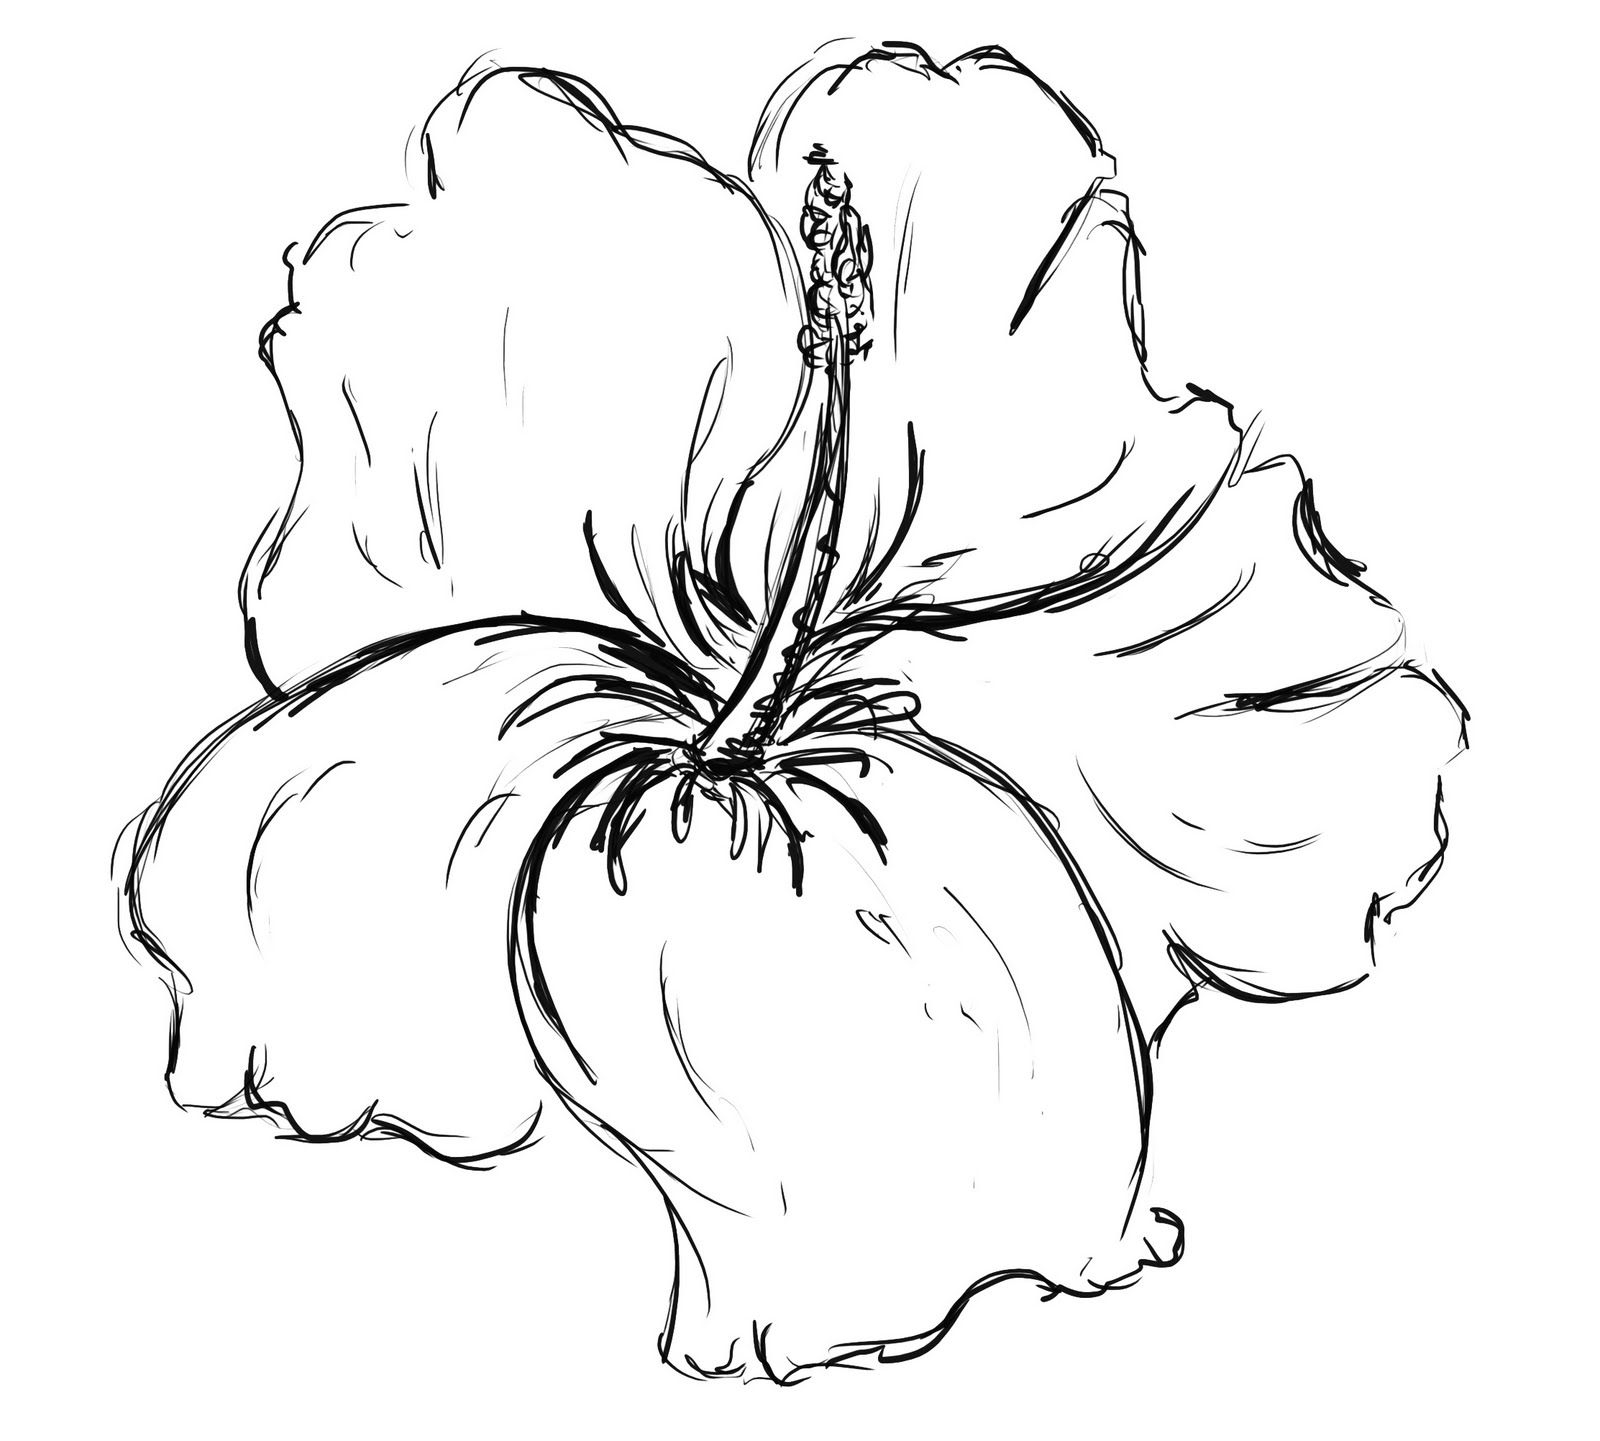
The Guiding Circle: Your Proportional Blueprint
As with many flower drawings, starting with a basic circle helps you create proportional petals and establish the overall size and shape of your flower. Draw a basic circle in the middle of your page, keeping it light and loose. This circle doesn’t have to be perfect because it’s only serving as a guide for the shape and placement of the petals. Think of it as a soft outline that will disappear as your drawing takes form. This initial step is crucial for ensuring your hibiscus drawing has a balanced and natural appearance.
Basic Petal Placement and Outlines
Once your guiding circle is in place, you can begin to sketch the main structure of the flower. This is the first step of our guide on how to draw a hibiscus, and we will start by drawing two petals for the flower. These will typically be the two most prominent petals that define the initial front-facing shape. Don't worry about perfection yet; focus on their general size and how they fit within your guiding circle. Lightly sketch their outlines, letting them flow naturally from the center of where the flower will be. These initial lines are the backbone of your hibiscus drawing.
Step-by-Step Guide to Drawing a Realistic Hibiscus Flower
Learning how to draw a realistic hibiscus flower is a rewarding process that can be broken down into simple, manageable steps. By following these instructions, you'll be able to create a beautiful and lifelike representation of this tropical bloom. Remember to keep your lines light in the initial stages so you can easily refine them.
Step 1: Initial Petals and Central Hub
Building on your guiding circle, begin by sketching the two most prominent petals that face the viewer. These will often form a V-shape or a slight curve. From the center of the flower, where the stamen will emerge, lightly draw lines extending out into the petals. At the center of the flower, there will be lots of solid black with the lines of the petals extending out into it. This dark central area will later define the base of the stamen and create depth. Think of this as the heart of your hibiscus drawing.
Step 2: Completing the Petal Structure
Now, draw the remaining petals of the hibiscus. Hibiscus flowers typically have five large petals, though some varieties may have more. Observe how the petals overlap each other, creating a sense of depth and natural flow. Some petals might be slightly curled or folded, adding to the realism. Use your guiding circle to ensure the petals are proportionate and fill the space appropriately. You can use a grid layout if you're aiming for precise realism, which helps in placing each petal accurately.
Step 3: Adding the Stamens and Pistil
The prominent stamen is a defining feature of the hibiscus. From the dark center you established in Step 1, draw a long, slender stalk (the staminal column) extending outwards. Along this column, add numerous small, delicate anthers, which are typically small, rounded shapes. At the very tip of the column, draw the stigma, which often branches into five distinct lobes. These details are crucial for a realistic hibiscus drawing and truly capture the flower's unique character.
Step 4: Drawing the Leaves and Stem
No flower drawing is complete without its accompanying foliage. At this stage of hibiscus drawing, we create the base of the large leaves of our plant. Hibiscus leaves are typically dark green, glossy, and have serrated edges. Draw the outlines of the leaves, considering their placement relative to the flower and the stem. They should appear natural, perhaps slightly curled or overlapping. Then, draw the stem in a way that looks sturdy enough to support the large bloom, connecting it smoothly to the base of the flower and the leaves.
Step 5: Contouring and Detailing
This is where your hibiscus drawing truly comes to life. Go over your light sketch lines with more confidence, refining the contours of the petals, leaves, and stamen. Add subtle veins to the leaves and delicate creases or folds within the petals to give them a three-dimensional quality. If you used a grid layout, now is the time to ensure all your details align perfectly. This step transforms your basic outlines into a detailed and expressive work of art, showcasing the intricate beauty of the hibiscus.
Bringing Your Hibiscus Drawing to Life with Color
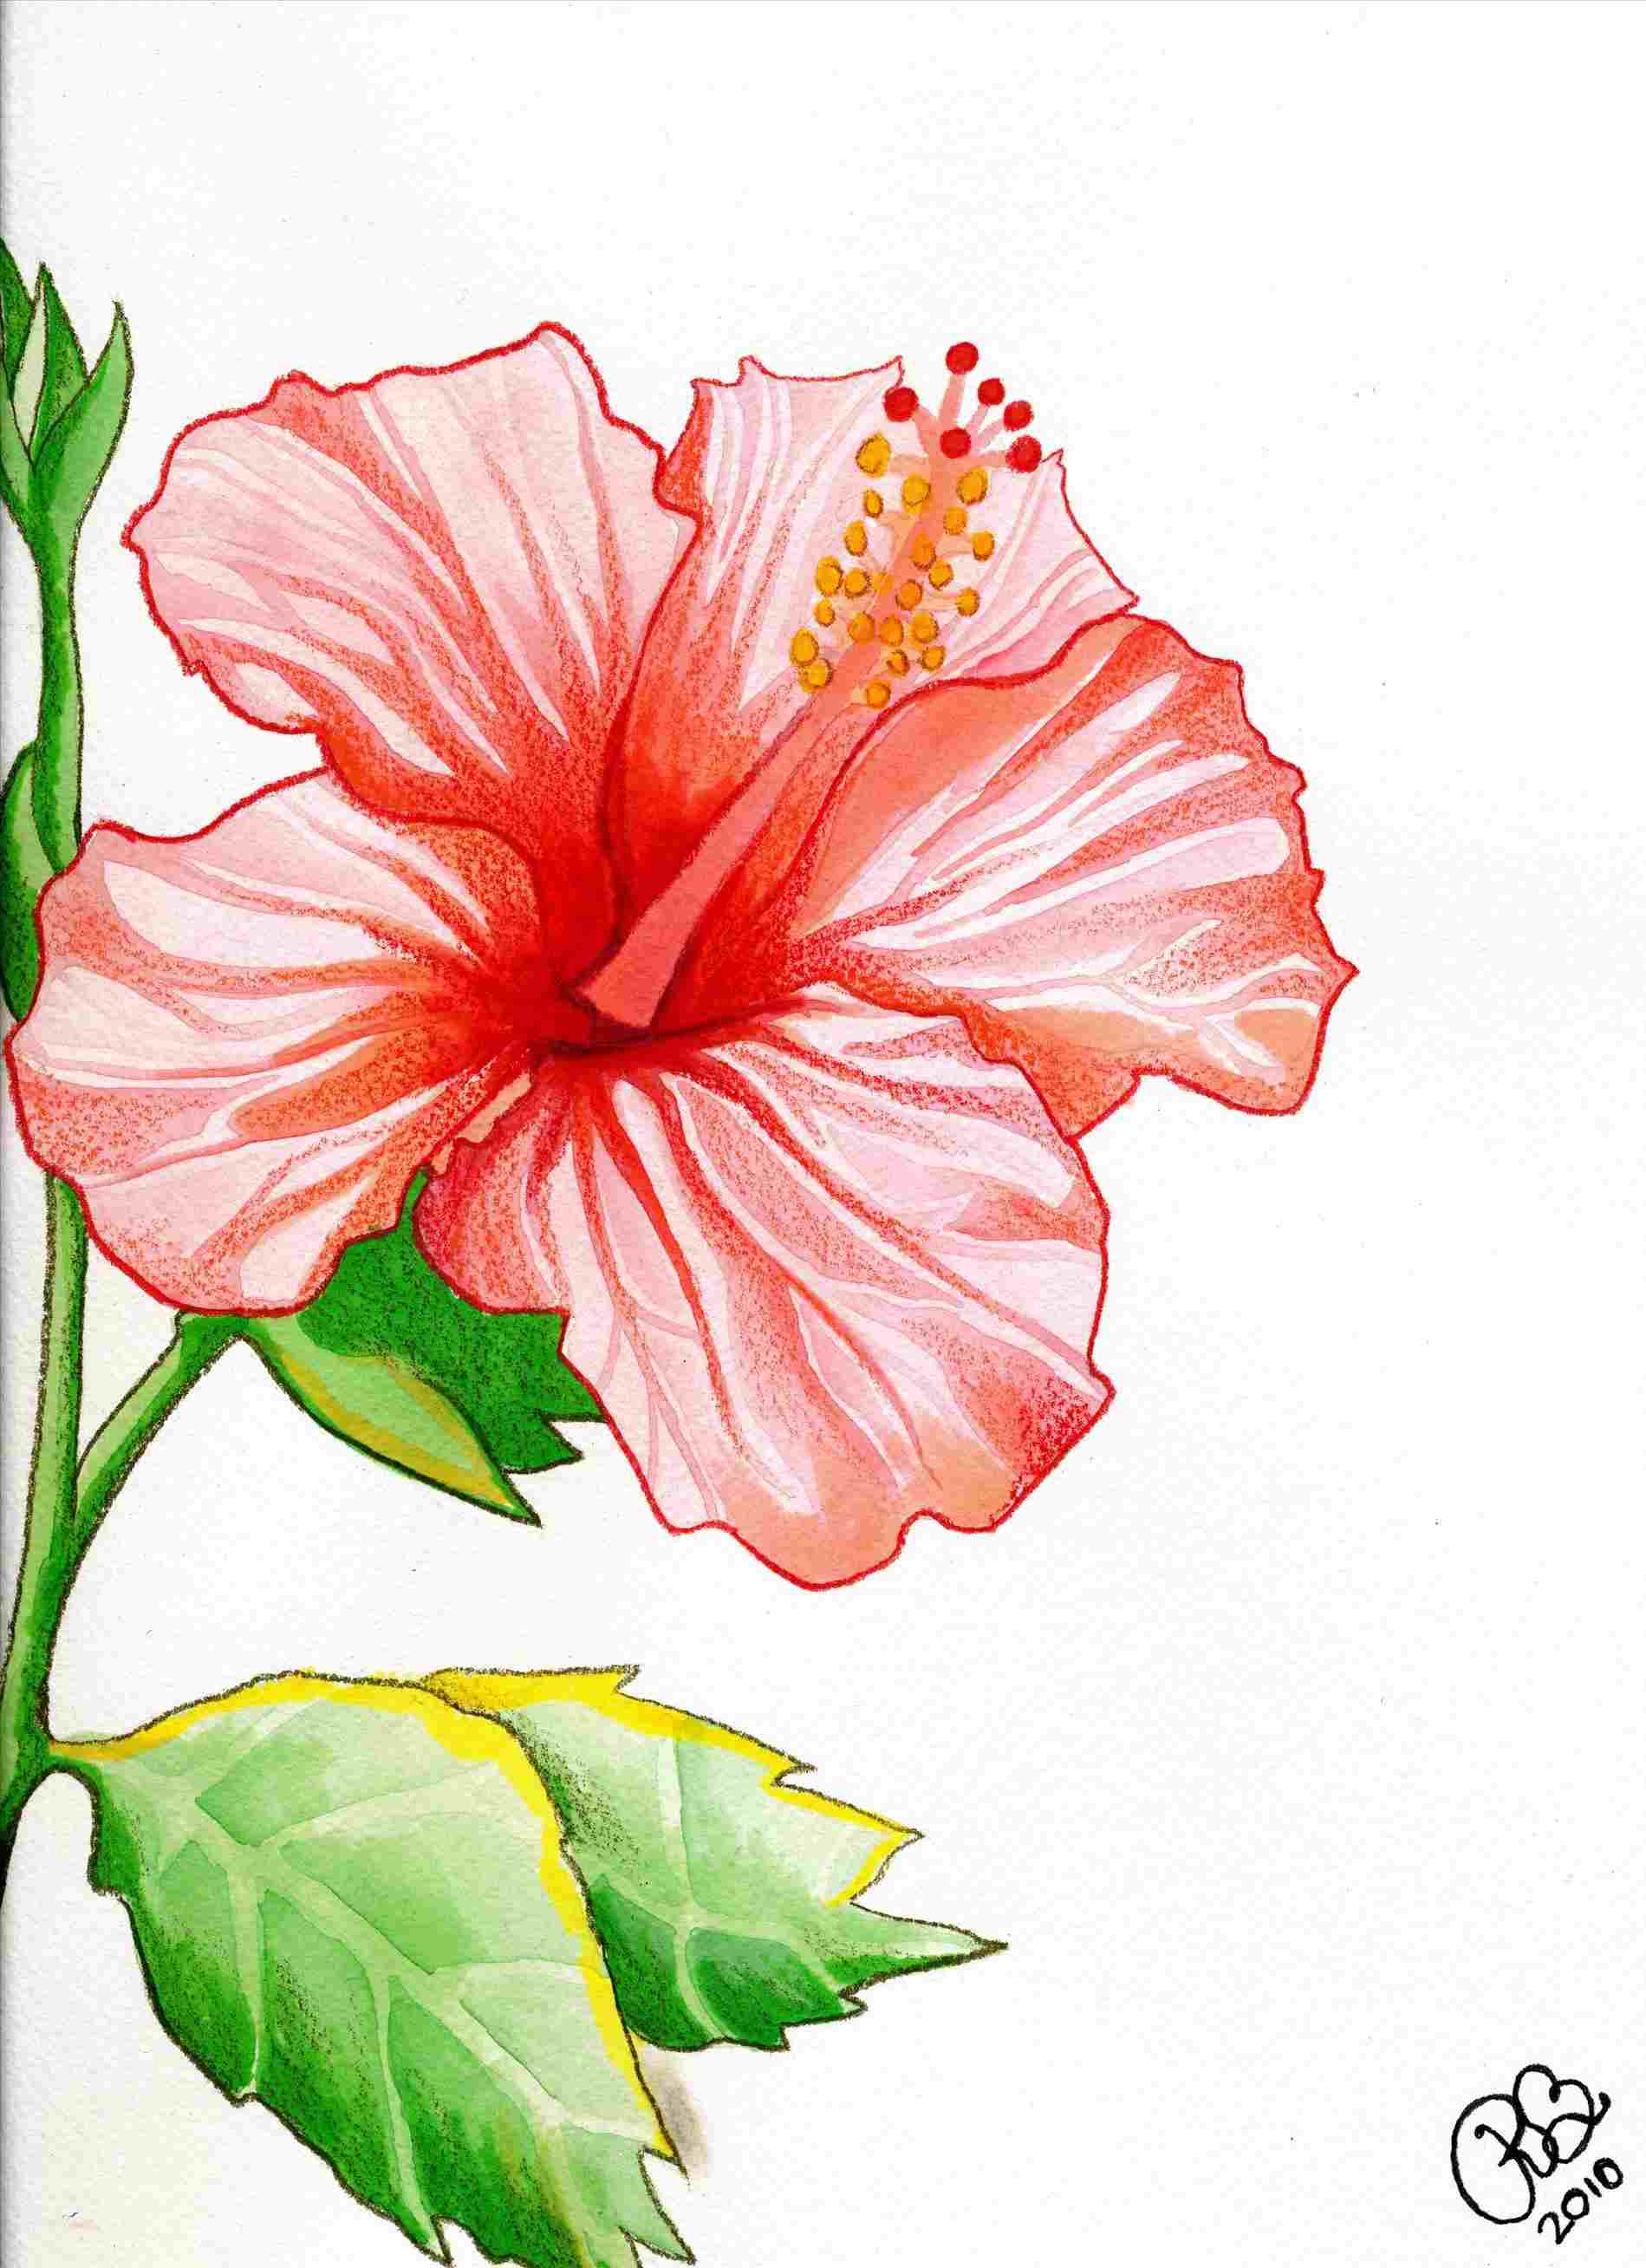
Color is where the hibiscus truly shines. These flowers are known for their incredibly vibrant hues, ranging from brilliant reds and oranges to soft pinks, yellows, and whites. Choosing the right colors and applying them effectively will make your hibiscus drawing pop off the page.
- Selecting Your Palette: While hibiscus come in many colors, a classic choice is a vibrant red or carnelian color, as mentioned in some tutorials. Consider the natural variations within a single petal – often, the color deepens towards the center and lightens towards the edges.
- Layering and Blending: Whether you're using colored pencils or markers, layering is key to achieving depth. Start with a light base color, then gradually build up darker shades in areas of shadow, such as where petals overlap or near the center of the flower. For colored pencils, use light pressure and build up layers; for markers, you might use different shades of the same color.
- Adding Highlights and Shadows: To make your hibiscus drawing look three-dimensional, pay attention to light. Leave some areas lighter to represent highlights where light hits the petals directly. Use darker tones for shadows to create contrast and define the form of the petals and leaves.
- Coloring the Petals and Leaves: Color all the petals of the hibiscus, perhaps starting with a base carnelian color and then adding depth. Next, draw the outlines of the leaves and petals of the hibiscus in colored tones, ensuring they complement the flower. For the stem, a natural green or brownish-green will work best.
- Experimentation: Don't be afraid to experiment with different color combinations and blending techniques. Watch videos on coloring flowers to pick up new tips and tricks. The beauty of art lies in personal expression, so let your creativity guide you!
Tips for Elevating Your Hibiscus Drawing Skills
With practice and patience, anyone can create stunning hibiscus drawings. Here are some tips to help you take your flower doodles to the next level and truly master the art of drawing these tropical beauties:
- Practice Consistently: The more you draw, the better you'll become. Even short, regular drawing sessions can make a huge difference. Don't aim for perfection in every drawing; aim for progress.
- Embrace Video Tutorials: Many online resources offer fantastic step-by-step guidance. Channels like "Art for Kids Hub," with their 9.46 million subscribers, offer easy-to-follow lessons on how to draw a hibiscus flower with easy steps, outlines, and markers. Search for "how to draw flowers playlist" for a wealth of inspiration. Watching a video allows you to see the strokes in real-time, which can be incredibly helpful.
- Do Sketching Exercises: Before attempting a full drawing, practice individual elements like petals, leaves, or the stamen. This helps build muscle memory and confidence.
- Explore Different Styles and Colors: Don't limit yourself to just one type of hibiscus drawing. Experiment with different artistic styles – from realistic to stylized, whimsical, or even abstract. Play with various color palettes beyond the traditional reds and pinks.
- Use Reference Photos Wisely: Find and save ideas about hibiscus drawing on Pinterest. Pinterest is a treasure trove of inspiration for hibiscus flower drawing, easy hibiscus drawing, or hibiscus flower drawing easy. Observe the basic structure, color, and cultural significance of these tropical blooms in various contexts.
- Don't Fear the Eraser: As mentioned before, erasing is